|
Voiced by Amazon Polly |
1. Introducing Single Sign-On?
Single Sign-On (SSO) is an authentication and authorization method that allows a user to log in to different apps using a single set of credentials (username and password).
End-users save time and effort with SSO. They do not have to sign in and out of a variety of applications, on-premises, and cloud services regularly. SSO makes overall password management easier in a company, enhancing productivity and security by lowering the chance of lost, weak, or forgotten passwords.
Customized Cloud Solutions to Drive your Business Success
- Cloud Migration
- Devops
- AIML & IoT
2. How does it work?
SSO aims to establish a trusting relationship between a service provider and an identity provider. This trust relationship is established mainly by exchanging a certificate between the identity provider and the service provider. This certificate can validate identification information given by the identity provider to the service provider, ensuring that it is from a trusted source. SSO saves this data in the form of tokens, which identify the user’s information like an email id or a username.
Organizations typically prefer to have a single identity throughout their apps and Cloud-based platforms. Azure Active Directory (AD) would be a popular authentication technique since Office 365 is widely used in businesses. It may serve as the authentication hub because it is frequently connected with other services.
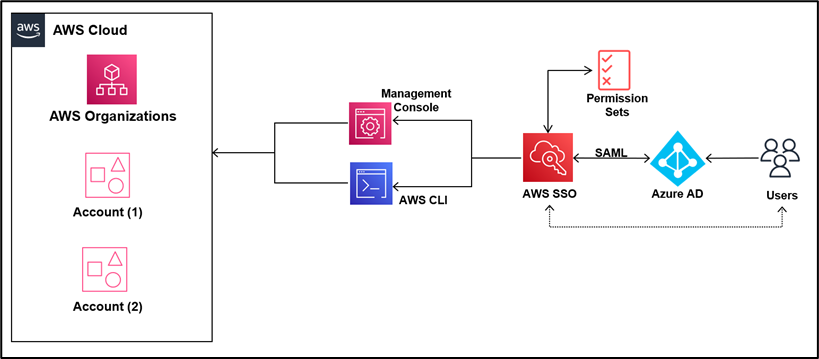
This blog will integrate AWS SSO on the Organization master account with Azure Active Directory to authenticate users. Such integrations help the administrator manage users and groups from a central source.
3. Step by Step Guide for Integration of AWS SSO with Azure AD
Let us put the following architecture into action
- Enable AWS SSO:
Log in to the AWS Console with the AWS master account, then navigate to the AWS Single Sign-On console.
Verify the upper right corner of the AWS Management console to ensure that they are in the correct region.
If you access the Single Sign-On service for the first time in this region, you will be greeted with the welcome screen below. Select “Enable AWS SSO.”
Once your SSO is enabled, click on “Change your Identity Source.” Navigate to Identity source and select action. Choose “Change identity source.”
By default, the identity source in AWS SSO. We will change it to “External Identity provider” to integrate with Azure AD. Download the metadata from step 2 and now switch to the azure side.
2. Configuring Azure AD as IdP
Login to your Azure account and navigate to Azure Active Directory. Select “Enterprise Applications” from the left panel and create a new application. Search for AWS SSO from the search bar then select AWS SSO as shown below:
After selecting AWS SSO, Click on Create. Now navigate to the application that you just created and select “Set up single sign-on” as shown below.
Select SAML on the next page and upload the metadata data you downloaded from AWS SSO.
After the upload is complete click “Save” and then close the Basic SAML Configuration pane. You will get a prompt to test the single sign-on with AWS Single Sign-On. You can click “No, I’ll test later.” Now download the Azure Federation Metadata XML as shown below.
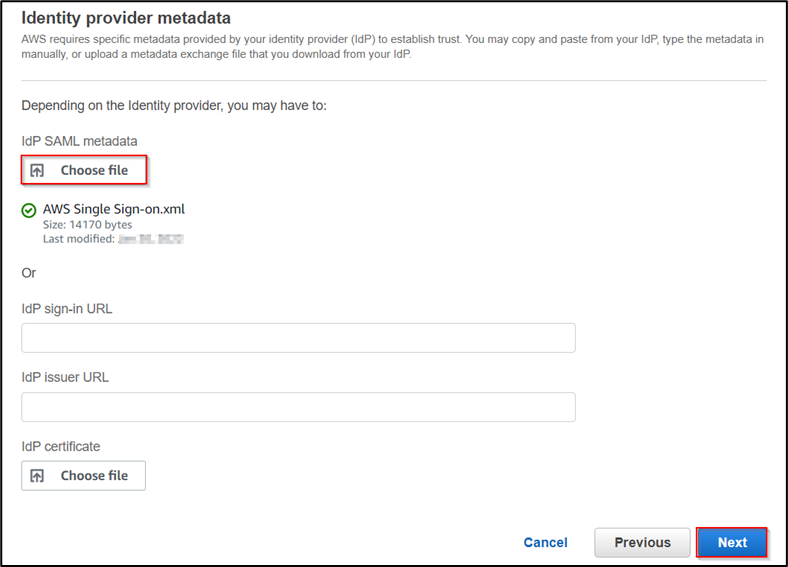
After downloading the metadata file, now back to the AWS console and upload the downloaded metadata as shown below then click on Next.
In the next step, acknowledge and change the identity source as shown.
The basic configuration is completed. Now let’s implement the automatic provision of users and groups from Azure AD using the SCIM protocol. Before automatic provisioning creates users and groups in your active directory and then add them to the application.
3. Automatic provisioning of Users and groups
In the left panel of AWS SSO, select “settings.” Navigate to the identity source and go to action. Click on “manage provisioning.” Enable the provisioning to Automatic and copy “SCIM endpoint” and “token” to the notepad.
Now, back to Azure. Navigate to “Provisioning” from the left panel in the application and click on Get Started. Change the provisioning mode to automatic and paste the copied SCIM endpoint and token that you copied from the AWS console. Click on Save.
Back in the “Provisioning” section and start the provisioning. The default provisioning interval is set to 40 minutes.
As shown above, the user is successfully provisioned. It should be visible in the AWS SSO console.
As the next step, we can assign permissions to the users and access AWS accounts as Azure AD users.
4. Takeaway
In this article, I demonstrated how we can integrate Azure AD to AWS Single Sign-On (SSO). With this connection, you can now manage access to AWS accounts and apps centrally for single sign-on and utilize automated provisioning to decrease complexity when maintaining and utilizing identities. Users no longer need to manage multiple identities and passwords to access their AWS accounts and apps since Azure AD can now serve as a single source for user management.
Get your new hires billable within 1-60 days. Experience our Capability Development Framework today.
- Cloud Training
- Customized Training
- Experiential Learning
About CloudThat
As a pioneer in the Cloud consulting realm, CloudThat is AWS (Amazon Web Services) Advanced Consulting Partner, AWS authorized Training Partner, Microsoft Gold Partner, and Winner of the Microsoft Asia Superstar Campaign for India: 2021. Our team has designed and delivered various Disaster Recovery strategies to our customers.
We are on a mission to build a robust cloud computing ecosystem by disseminating knowledge on technological intricacies within the cloud space. Our blogs, webinars, case studies, and white papers enable all the stakeholders in the cloud computing sphere to advance in their businesses.
To get started, go through our Expert Advisory page and Managed Services Package that is CloudThat’s offerings. Then, you can quickly get in touch with our highly accomplished team of experts to carry out your migration needs. Feel free to drop a comment or any queries that you have about the AWS Single Sign-On service, Active Directory, or any other AWS service, and we will get back to you quickly.
FAQs
1. How can I manage the permissions granted to my users when they use AWS SSO to access their accounts?
ANS: – You may limit your users’ privileges when providing them access by selecting a permission set. Permission sets are groups of permissions that you may construct in AWS SSO by modeling them after AWS-managed policies for job functions or any other AWS-managed policies. AWS-managed job function policies are intended to closely correlate with popular job functions in the IT sector. You may even fully tailor the permission set to fit your security needs if necessary. These permissions are automatically applied to the specified accounts by AWS SSO. As you modify the permission settings, AWS SSO allows you to simply apply the changes to the necessary accounts. These permissions limit what your users can do within the accounts when they access them using the AWS SSO user site. You may also give your users different sets of permissions. When users log in to the account via the user portal, they may choose the permission set they want to utilize for that session.
2. What challenges does AWS SSO solve?
ANS: – AWS SSO removes the administrative complexities associated with customized SSO systems used to manage identities across AWS accounts and business apps. You can also configure the AWS accounts with the required permissions to allow access to that accounts. AWS SSO is free and it eliminates the complexity. AWS SSO simplifies the user experience and increases security by removing the requirement for distinct passwords for each AWS account or cloud business application if you use separate passwords to access various AWS accounts or cloud apps. AWS SSO also solves the problem of limited visibility of cloud-based application access by integrating with AWS CloudTrail and offering a centralized location for you to audit SSO access to AWS accounts and SAML-enabled cloud apps like Microsoft 365, Salesforce, and Box.

WRITTEN BY Sridhar Immanni


 Login
Login


 April 18, 2022


 PREV
PREV


Ananay Ojha
May 7, 2022
Very nicely written, Thanks
vishal
Apr 25, 2022
Good one
Anusha Mullapudi
Apr 23, 2022
Useful blog
Jaivanth Edupuganti
Apr 22, 2022
Great 👍
Hema
Apr 22, 2022
Nice blog
Guruprasad
Apr 22, 2022
Wonderful and useful content
Janjarla Prasanna
Apr 22, 2022
Good Work